|
Published in Dinghy Cruising Journal 240
Hatseflats Design Features
Building your own boat is very rewarding because you will know her inside out even before you sail her for the first time.
If you are building your boat from a kit you will understand much more about her than by the closest scrutiny of her specs.
And if you are working from plans, many issues will require your thoughts that you would otherwise have taken for granted.
I designed and built Hatseflats without previous experience in other cruising dinghies.
To build the hull I could still rely on past experience in building Moths and the TooPhat dinghy that I built in 2008.
After that I had to slow down because this was new territory.
During the cold winter months I would think, design, rethink, redesign and finally build the
remaining components one at a time.
My first mantra was to let robustness prevail over aesthetics and if needed over practicality.
The other mantra was only to make a hole if it could not be avoided.
As every design decision is a trade-off I was curious whether the end result would be good.
Looking back most of the ideas appear to worked out well.
If you are planning to build your own boat, I hope that you find this article useful.
General construction
Hatseflats was built as a monocoque from plywood panels and bulkheads.
Most of its strength therefore comes from the plywood panels bonded with epoxy fillets and glass.
Stringers were used to support the decks, to form gunwales, and to form the skids under the hull.
Compared to the popular open gunwales, the full-length inwales and outwales in Hatseflats provide
a lot more torsional strength.
External knees were used to reinforce the corners, and are stronger because their bigger bonding area.
The (small) hatches in the bulkheads are less practical than deck hatches but were chosen to retain
compression strength in the bow area.
The full length skids with brass strips allow to drive Hatseflats up a concrete slipway.
They took 20 extra hours to build but they proved their worth on several occasions!
The inner bulkheads which separate buoyancy from stowage compartments indirectly added 50 hours to the build.
They will be my last resort if it comes to the worst.
I did not use glue for any construction work but always epoxy. This resulted in incredibly strong bonds.
When fitting out Hatseflats I could not remove wrongly installed rowlocks without sawing them to pieces.
For better durability I gave every part three coats of epoxy and finally three coats of two-pot polyurethane paint.
For the same reason, I used paint instead of varnish for the deck and interior.
Buoyancy
For every kilo of weight of the boat and crew I wanted a litre of reserve buoyancy.
In my TooPhat design I used a double-bottom to achieve this.
The double bottom was easy to build, but not practical.
After a capsize, TooPhat was hard to re-enter with 150 litres of water sloshing from side to side.
For Hatseflats I discarded the easy fix of a double bottom.
Instead I created watertight compartments under the fore and aft deck to contain incoming water low down in the main cockpit.
Additional buoyancy comes from the hull skin, waterproof bags, jerrycans and fenders.
Apart from the main cockpit, I designed a forward 'pit' for anchors and buckets.
Because incoming water is now kept in two separate holds, Hatseflats should be more stable after a capsize.
Last year I had a near capsize while hoisting sail in a gusty force 4.
Even with about 250 litres of water in the main cockpit, Hatseflats felt manageable.
Daggerboard Case
With a centreboard you can sail up a beach without breaking your board or your boat.
But this comes at a price: the long slot in the bottom weakens the hull and creates extra drag.
A centerboard also requires a pin, a weight to keep the board down and a line to haul it up,
and a gasket over the centerboard slot.
Having experienced only minor breakages with daggerboards in 40 years of dinghy sailing,
I let simplicity and robustness once again prevail over comfort.
I pre-fabricated a robust daggerboard case for Hatseflats, injecting epoxy resin into the corners to create massive fillets.
The case was bonded into the hull with liberal amounts of thickened epoxy.
The daggerboard itself was made from 3 layers of plywood, intended to break before the daggerboard case itself.
Since only half of the layers in the plywood provide strength, a NACA profile made from plywood is bound to be fragile.
Therefore I only rounded the leading edge and tapered the last 9 cm of the trailing edge and
sheathed it with 160g epoxy and glass.
I made the rudder blade identical to the daggerboard to be used as an emergency daggerboard.
Rudder box
In my previous boats I had always used a kick-up rudder.
These work fine when fully down but are vulnerable when used hard in shallow waters.
Michael Storers rudder design for the Goat Island Skiff provided the solution for Hatseflats:
a lifting rudder held in a open-ended rudder box by an elastic.
When running aground, the elastic will stretch so that the rudder kicks up without any damage.
My rudder box for Hatseflats is slightly less elegant but should be very strong.
The kick-up feature came in handy several times so it seems a winner!
Mast support
I wanted to make the mast gate and mast step extra strong to withstand
the high loads from the unstayed rig in windy conditions.
The mast gate was laminated from Oregon pine, bonded to the mast bulkhead with epoxy and bolted through
with two 10mm threaded rods for good measure.
The mast step is an oversized plywood shoe laminated to a height of 70mm and bonded to the bottom hull panel.
It was also fastened with 4 hefty screws from the outside to prevent it from shearing off in extreme conditions.
I did not want to lock or latch the mast into the mast gate.
Simply because I did not know how to make this strong enough for extreme conditions.
Instead I used an old-fashioned lashing with 6mm dyneema to tie the mast to 16mm belaying pins.
After one of the wooden pins gave way, I replaced both pins with 16mm stainless steel pins and had no trouble since.
Interior
The cockpit was designed as a big hold with room to fit a standard bicycle.
The use of full-length inwales and outwales provided sufficient torsional strength to allow this.
Two removable seats and a floorboard were designed to provide basic creature comforts when sailing.
The seats and floorboard were designed as a sandwich of two layers of 8mm plywood with Oregon pine battens as spacers.
With the aid of the online 'sagulator' calculator I adjusted the cross section until arriving at the required stiffness.
When sailing, the seats and floorboard are bolted in place with 8mm stainless bolts and wing nuts.
Raising the floorboard to its upper position between the seats gives a sleeping area of 300x120cm at 30cm above the waterline.
On the last evening of the Raid NL, Hatseflats proved a bit too tippy when I was setting up the boat tent.
The sleeping bag took a couple of days to dry.
Trailer
I ordered a trailer from Pega Trailers in the Netherlands as soon as the hull construction was under way.
The basis is a standard breakback trailer customised for Hatseflats' flat bottomed hull shape.
When Hateflats is winched on the trailer, the rollers on the trailer work with the skid rails on the hull so
that it is automatically centered.
With the breakback construction and the wheels at the end the trailer wheels can stay dry.
No rusty bearings for me please!
A very nice touch is the split lightboard with LED lights.
Both halves of the lightboard swing out of the way when the boat is winched on the trailer.
Once Hatseflats is on the trailer, they are swung back into place.
With the waterproof LED lights I don't have to worry about maintenance anymore.
Rig
As a romantic, I was drawn to varnished wood spars.
Being a pragmatist with a tight schedule I had bought anodised alloy tubes, a new Tirik sail and
a good supply of dyneema in various colours and thicknesses to make a working a rig in a single day.
I must admit to being inspired by the Vivier and Oughtred designed rigs and had even bought a pretty
expensive mast traveller to hold up the yard.
Eventually I largely copied the rigging method of the Goat Island Skiff with minor changes:
for the sake of comfort I invested in all-Harken blocks.
I used Harken blocks, dyneema rope and carabiners for a reefing setup on the boom.
Setting the first reef is really easily. For the second and third reef you need to lower the sail all the way down.
This is not too bad because it will blow a whole lot harder when you need to do this.
During the first season I reefed down to the second reef only three times.
I have yet to find the conditions for the third reef.
Summary
During this first season I sailed about 30 times with Hatseflats. A few times the wind increased to a force 5.
One afternoon on the Ijsselmeer I may have had a force 6 but I did not dare to check the anemometer.
It is still too early to predict how Hatseflats will handle in really heavy weather but so far it has been good sailing!
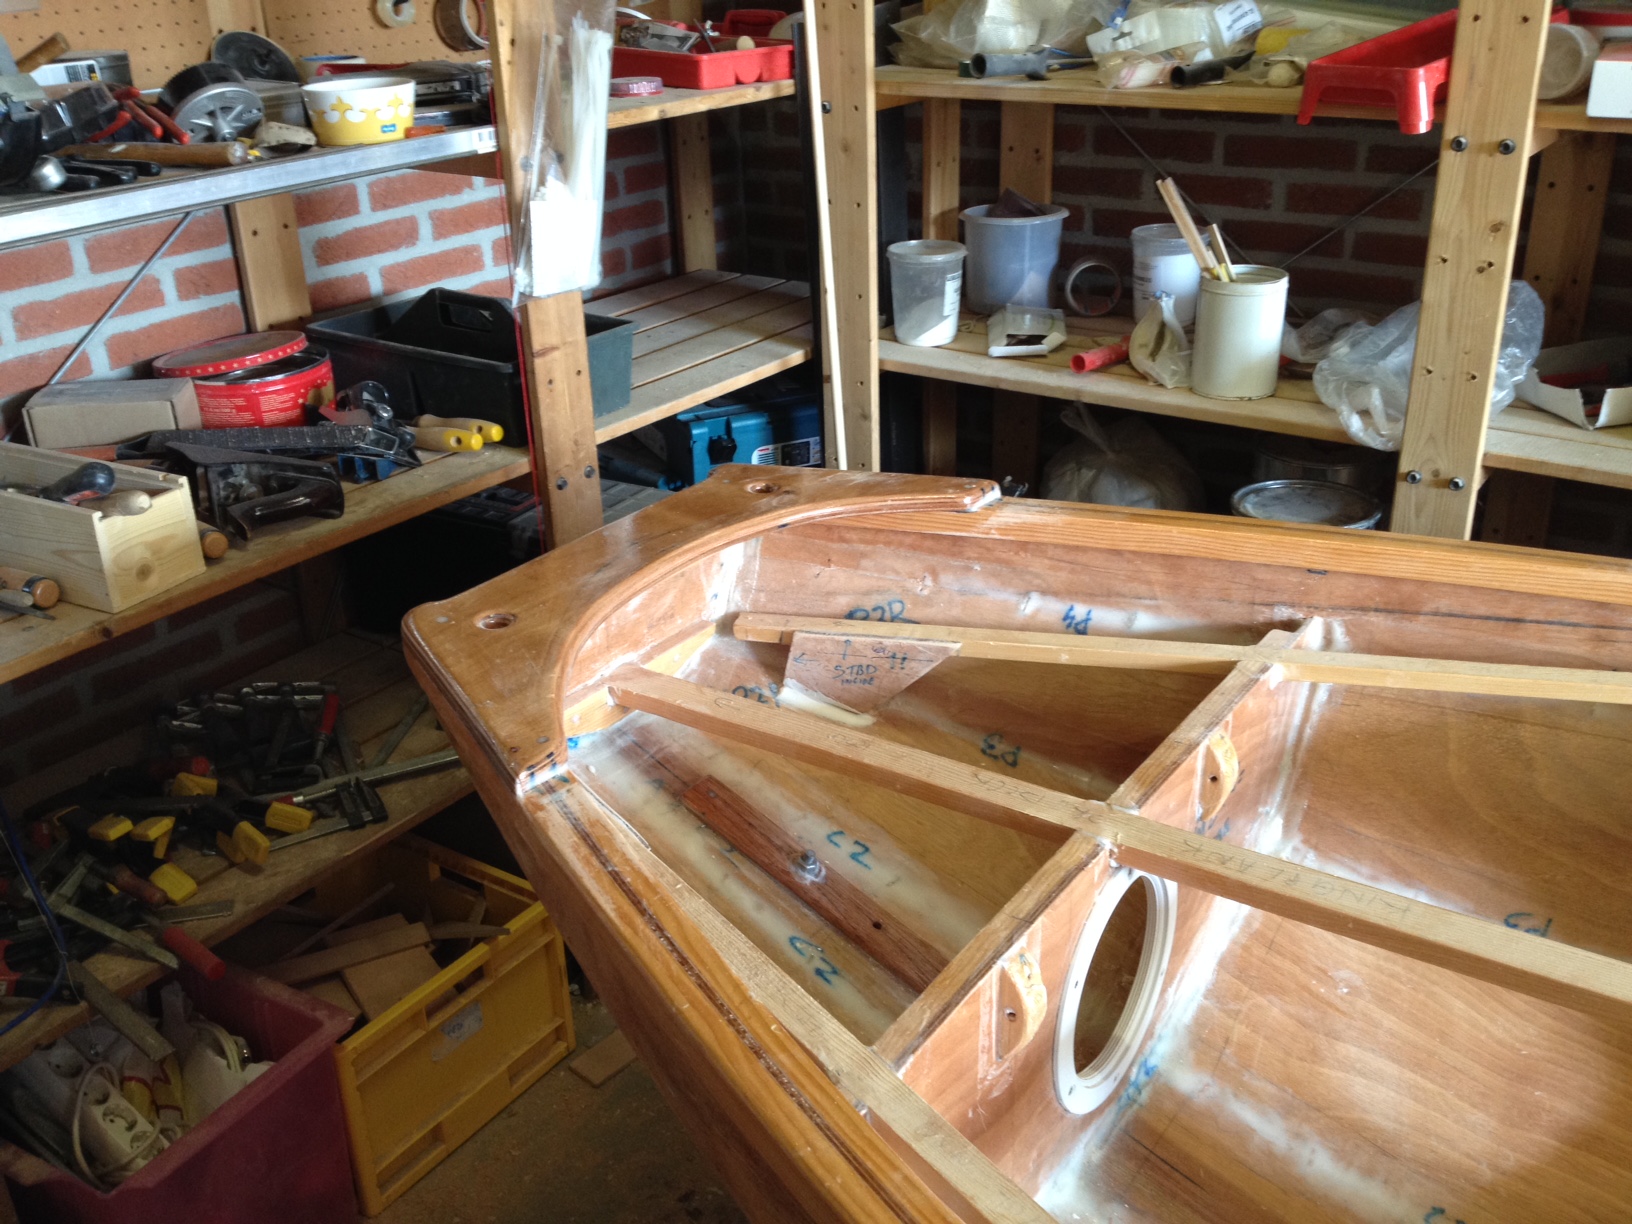
External knees, solid inwales/outwales for extra strength
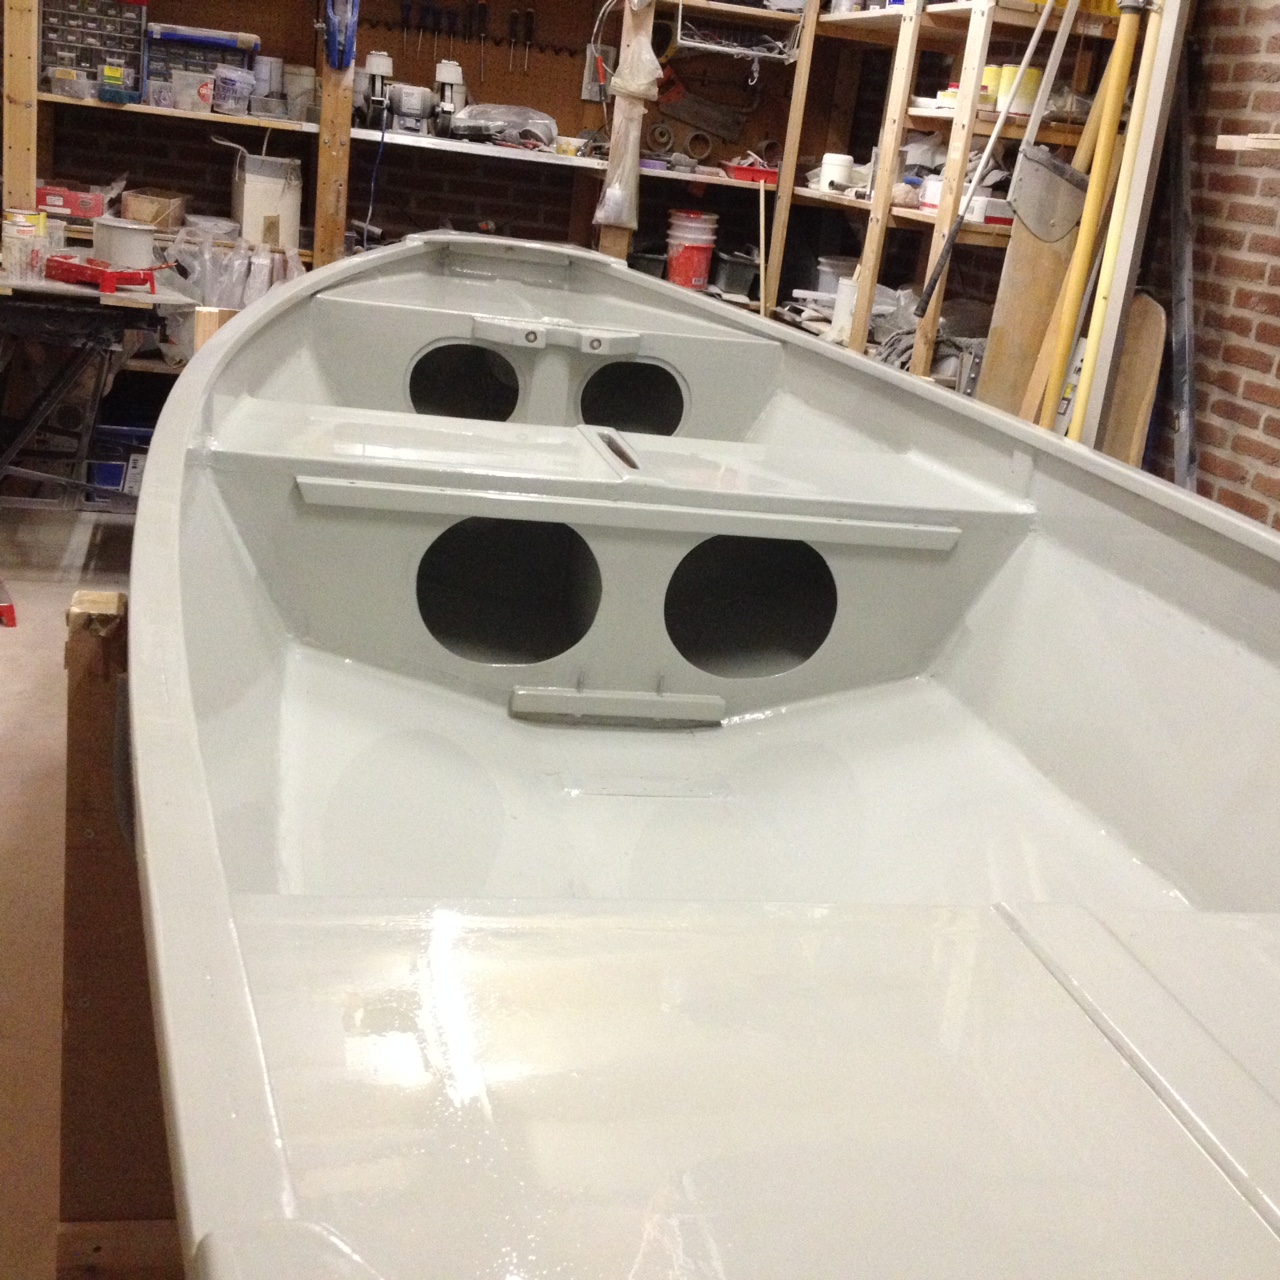
Separate main cockpit and forward 'pit'
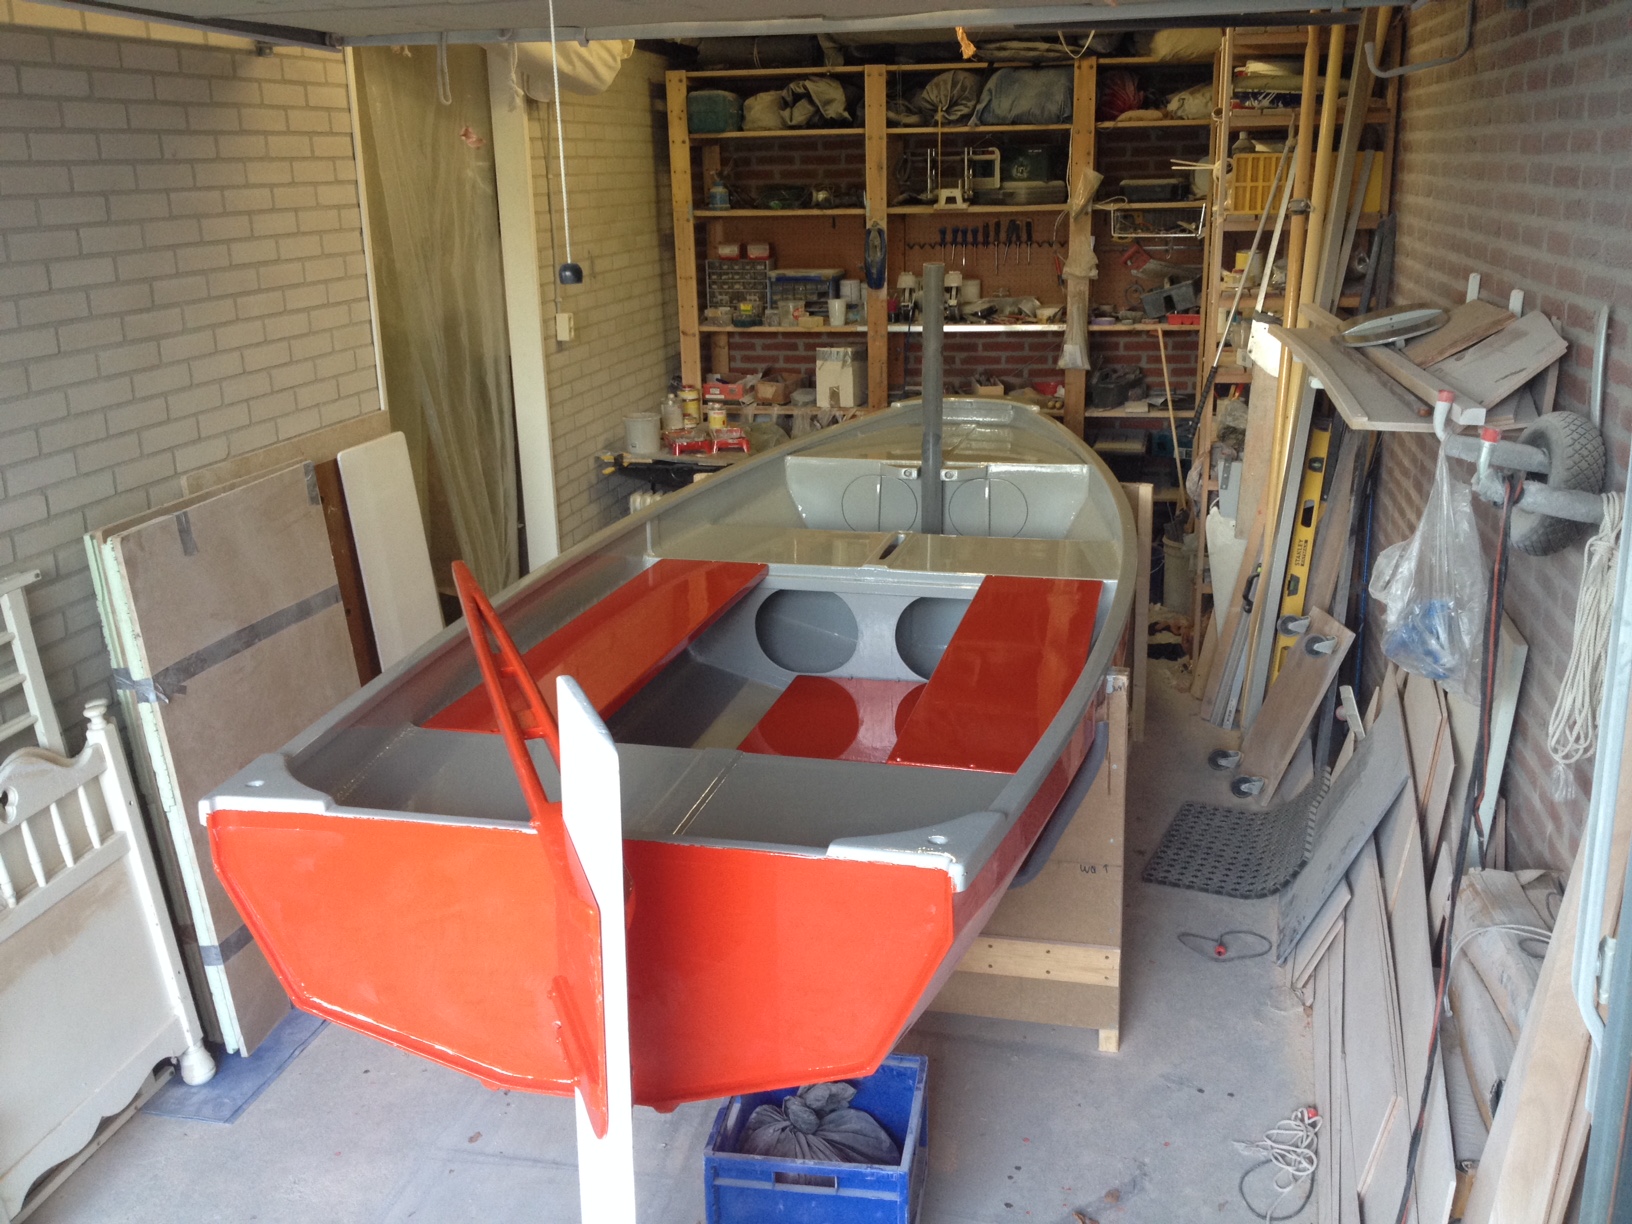
Deck with rudder box, removable seats and floorboard.
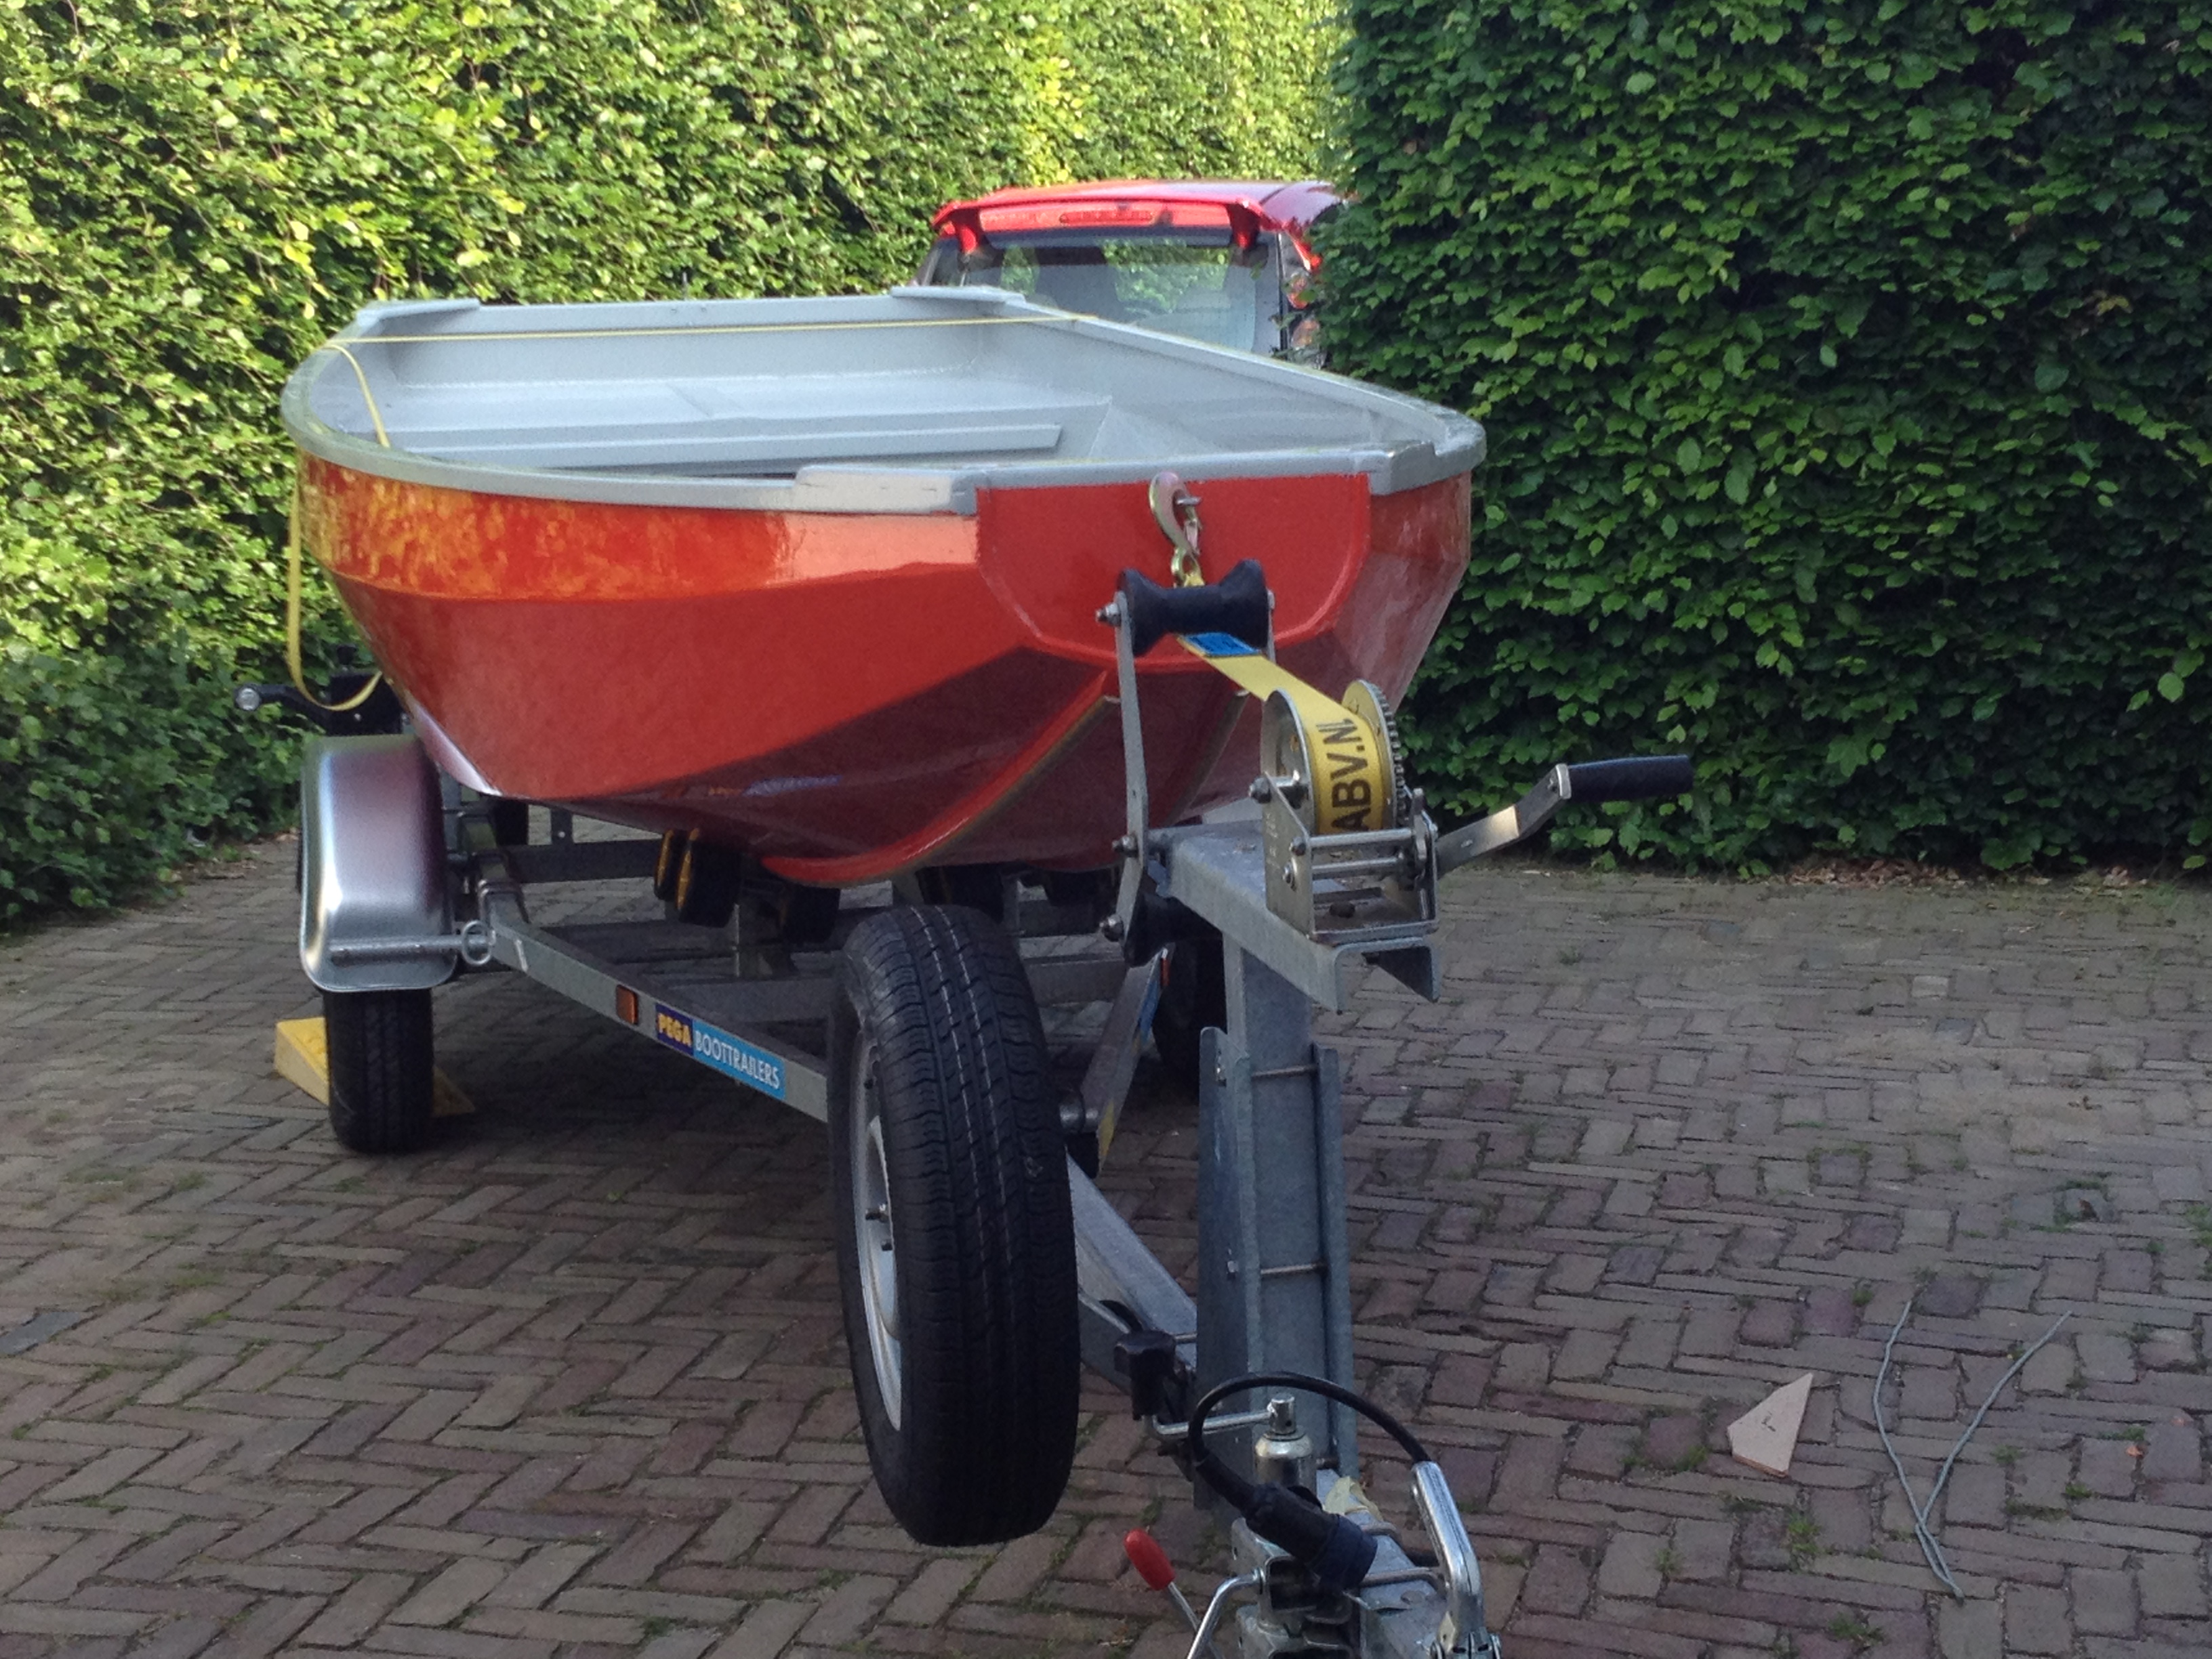
Hatseflats on trailer with full length skids under the hull.
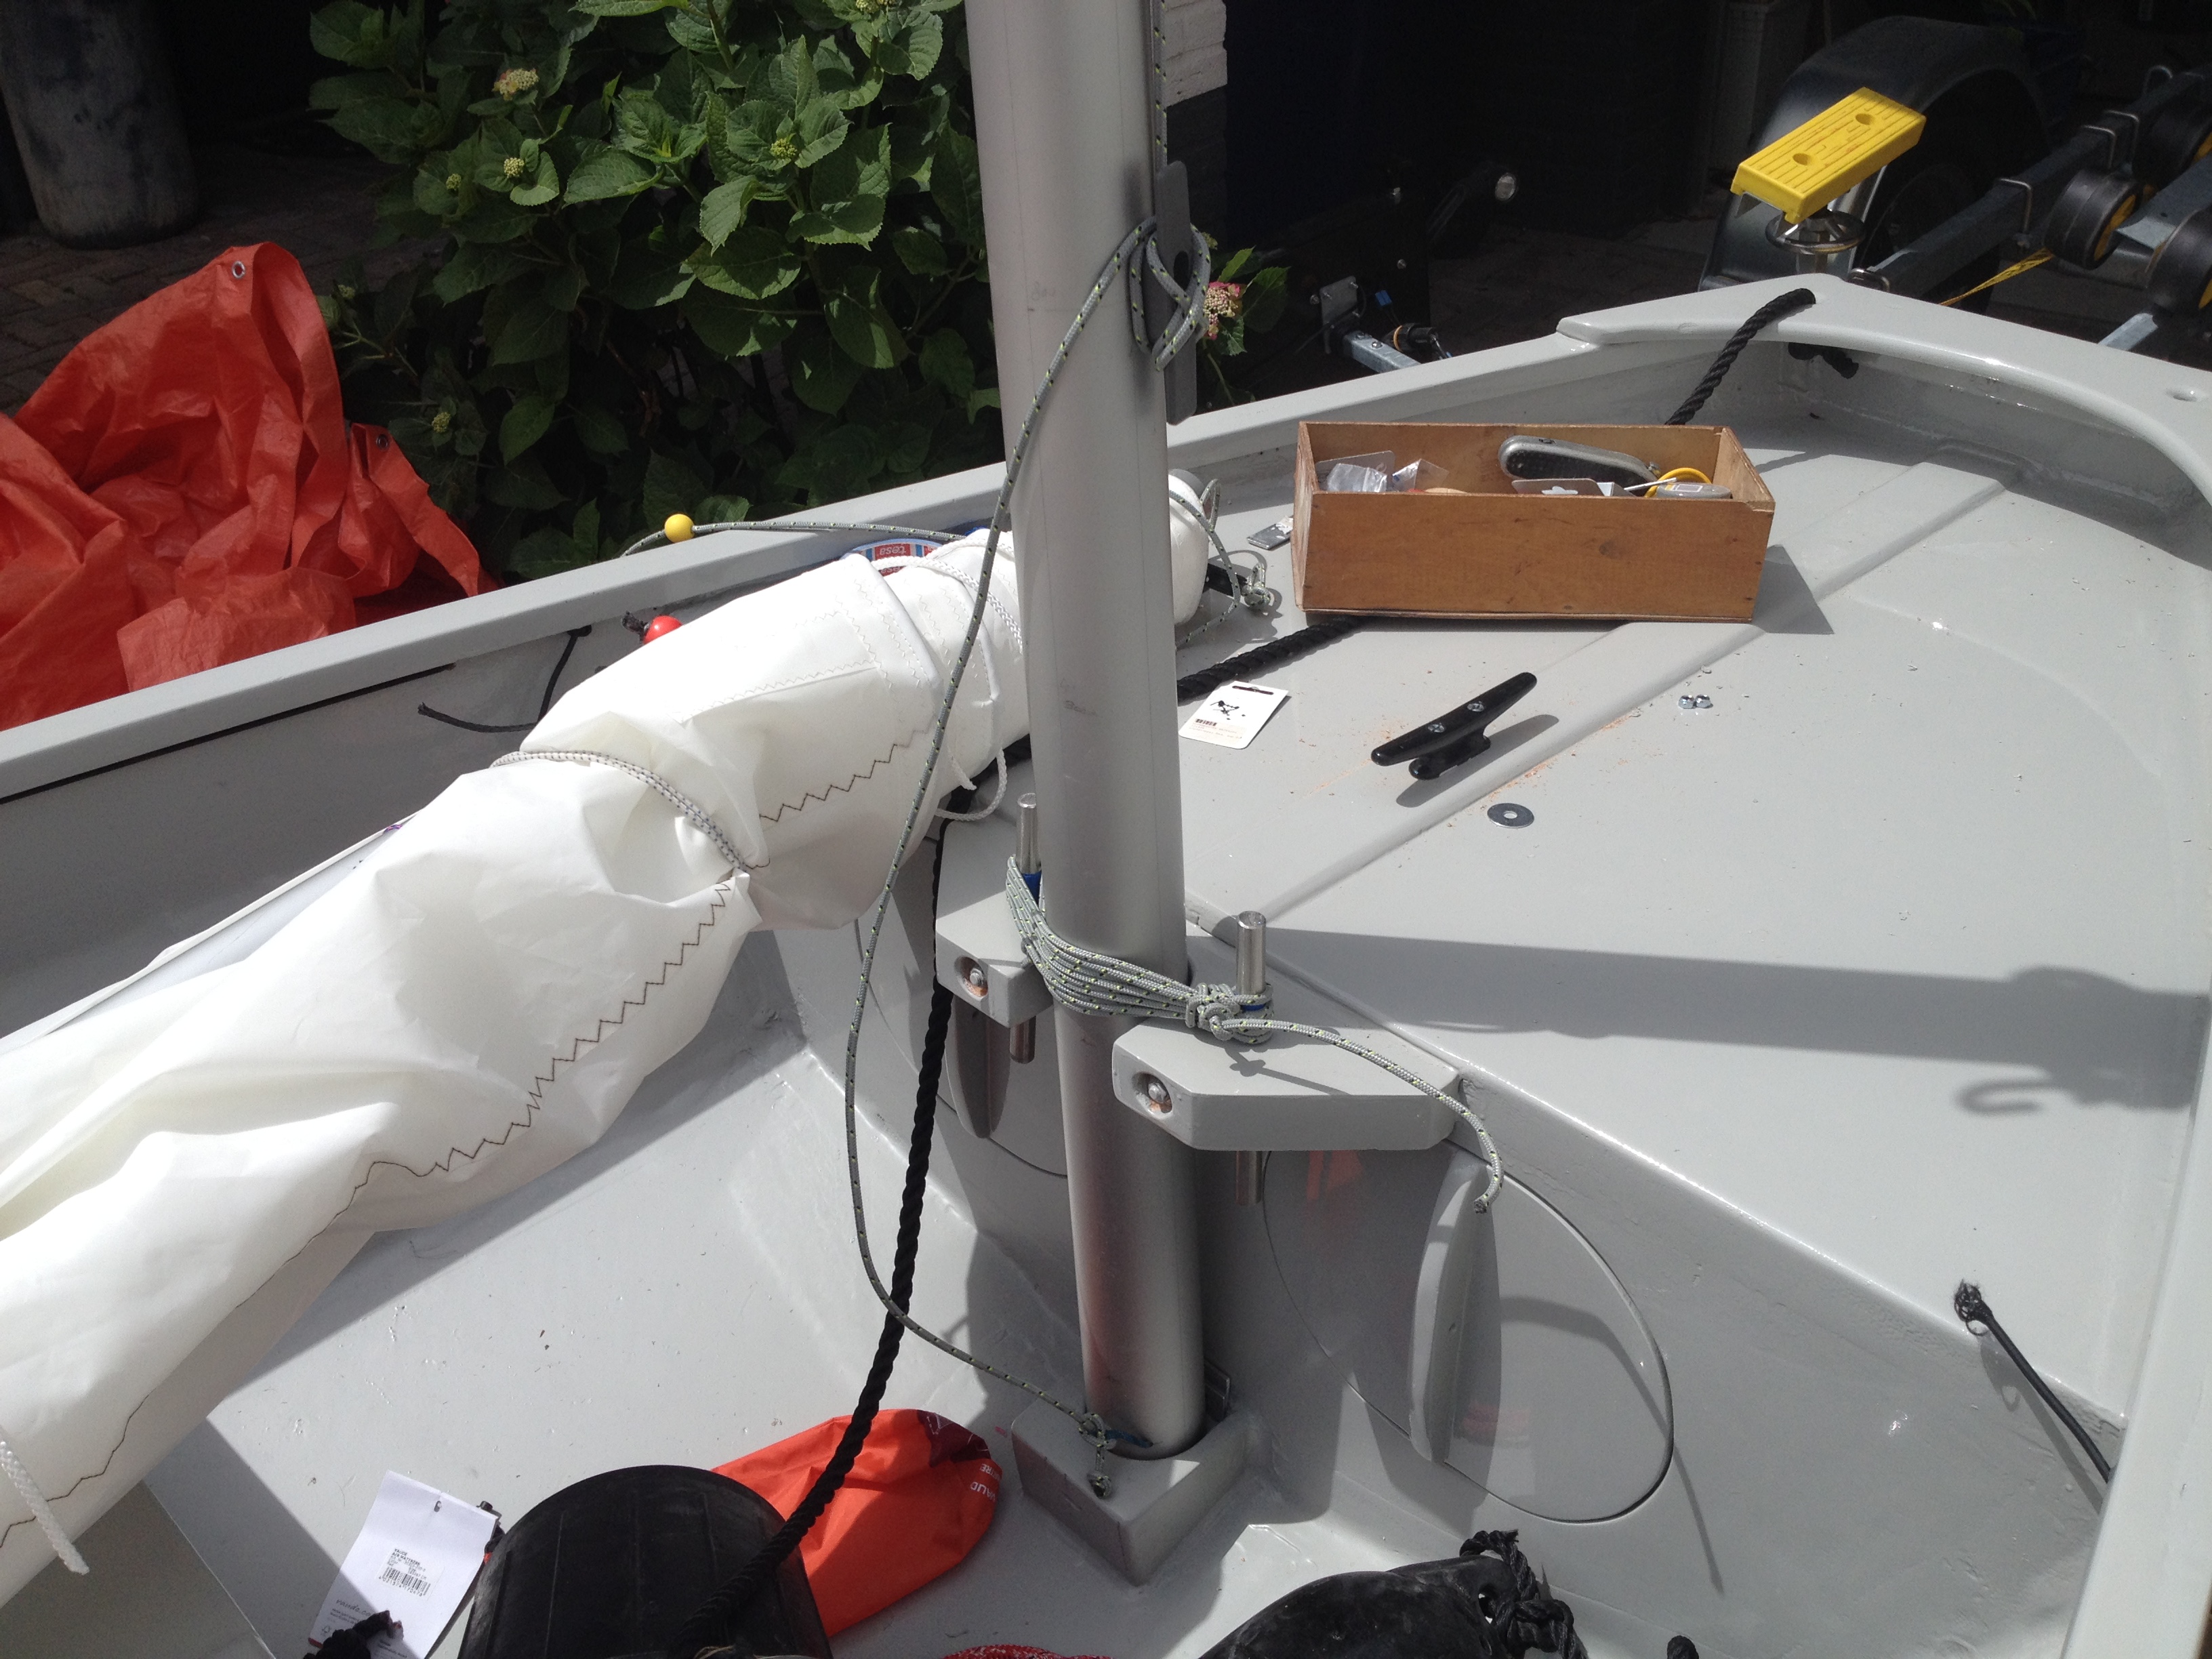
Foredeck with mast support and stainless steel belaying pins.
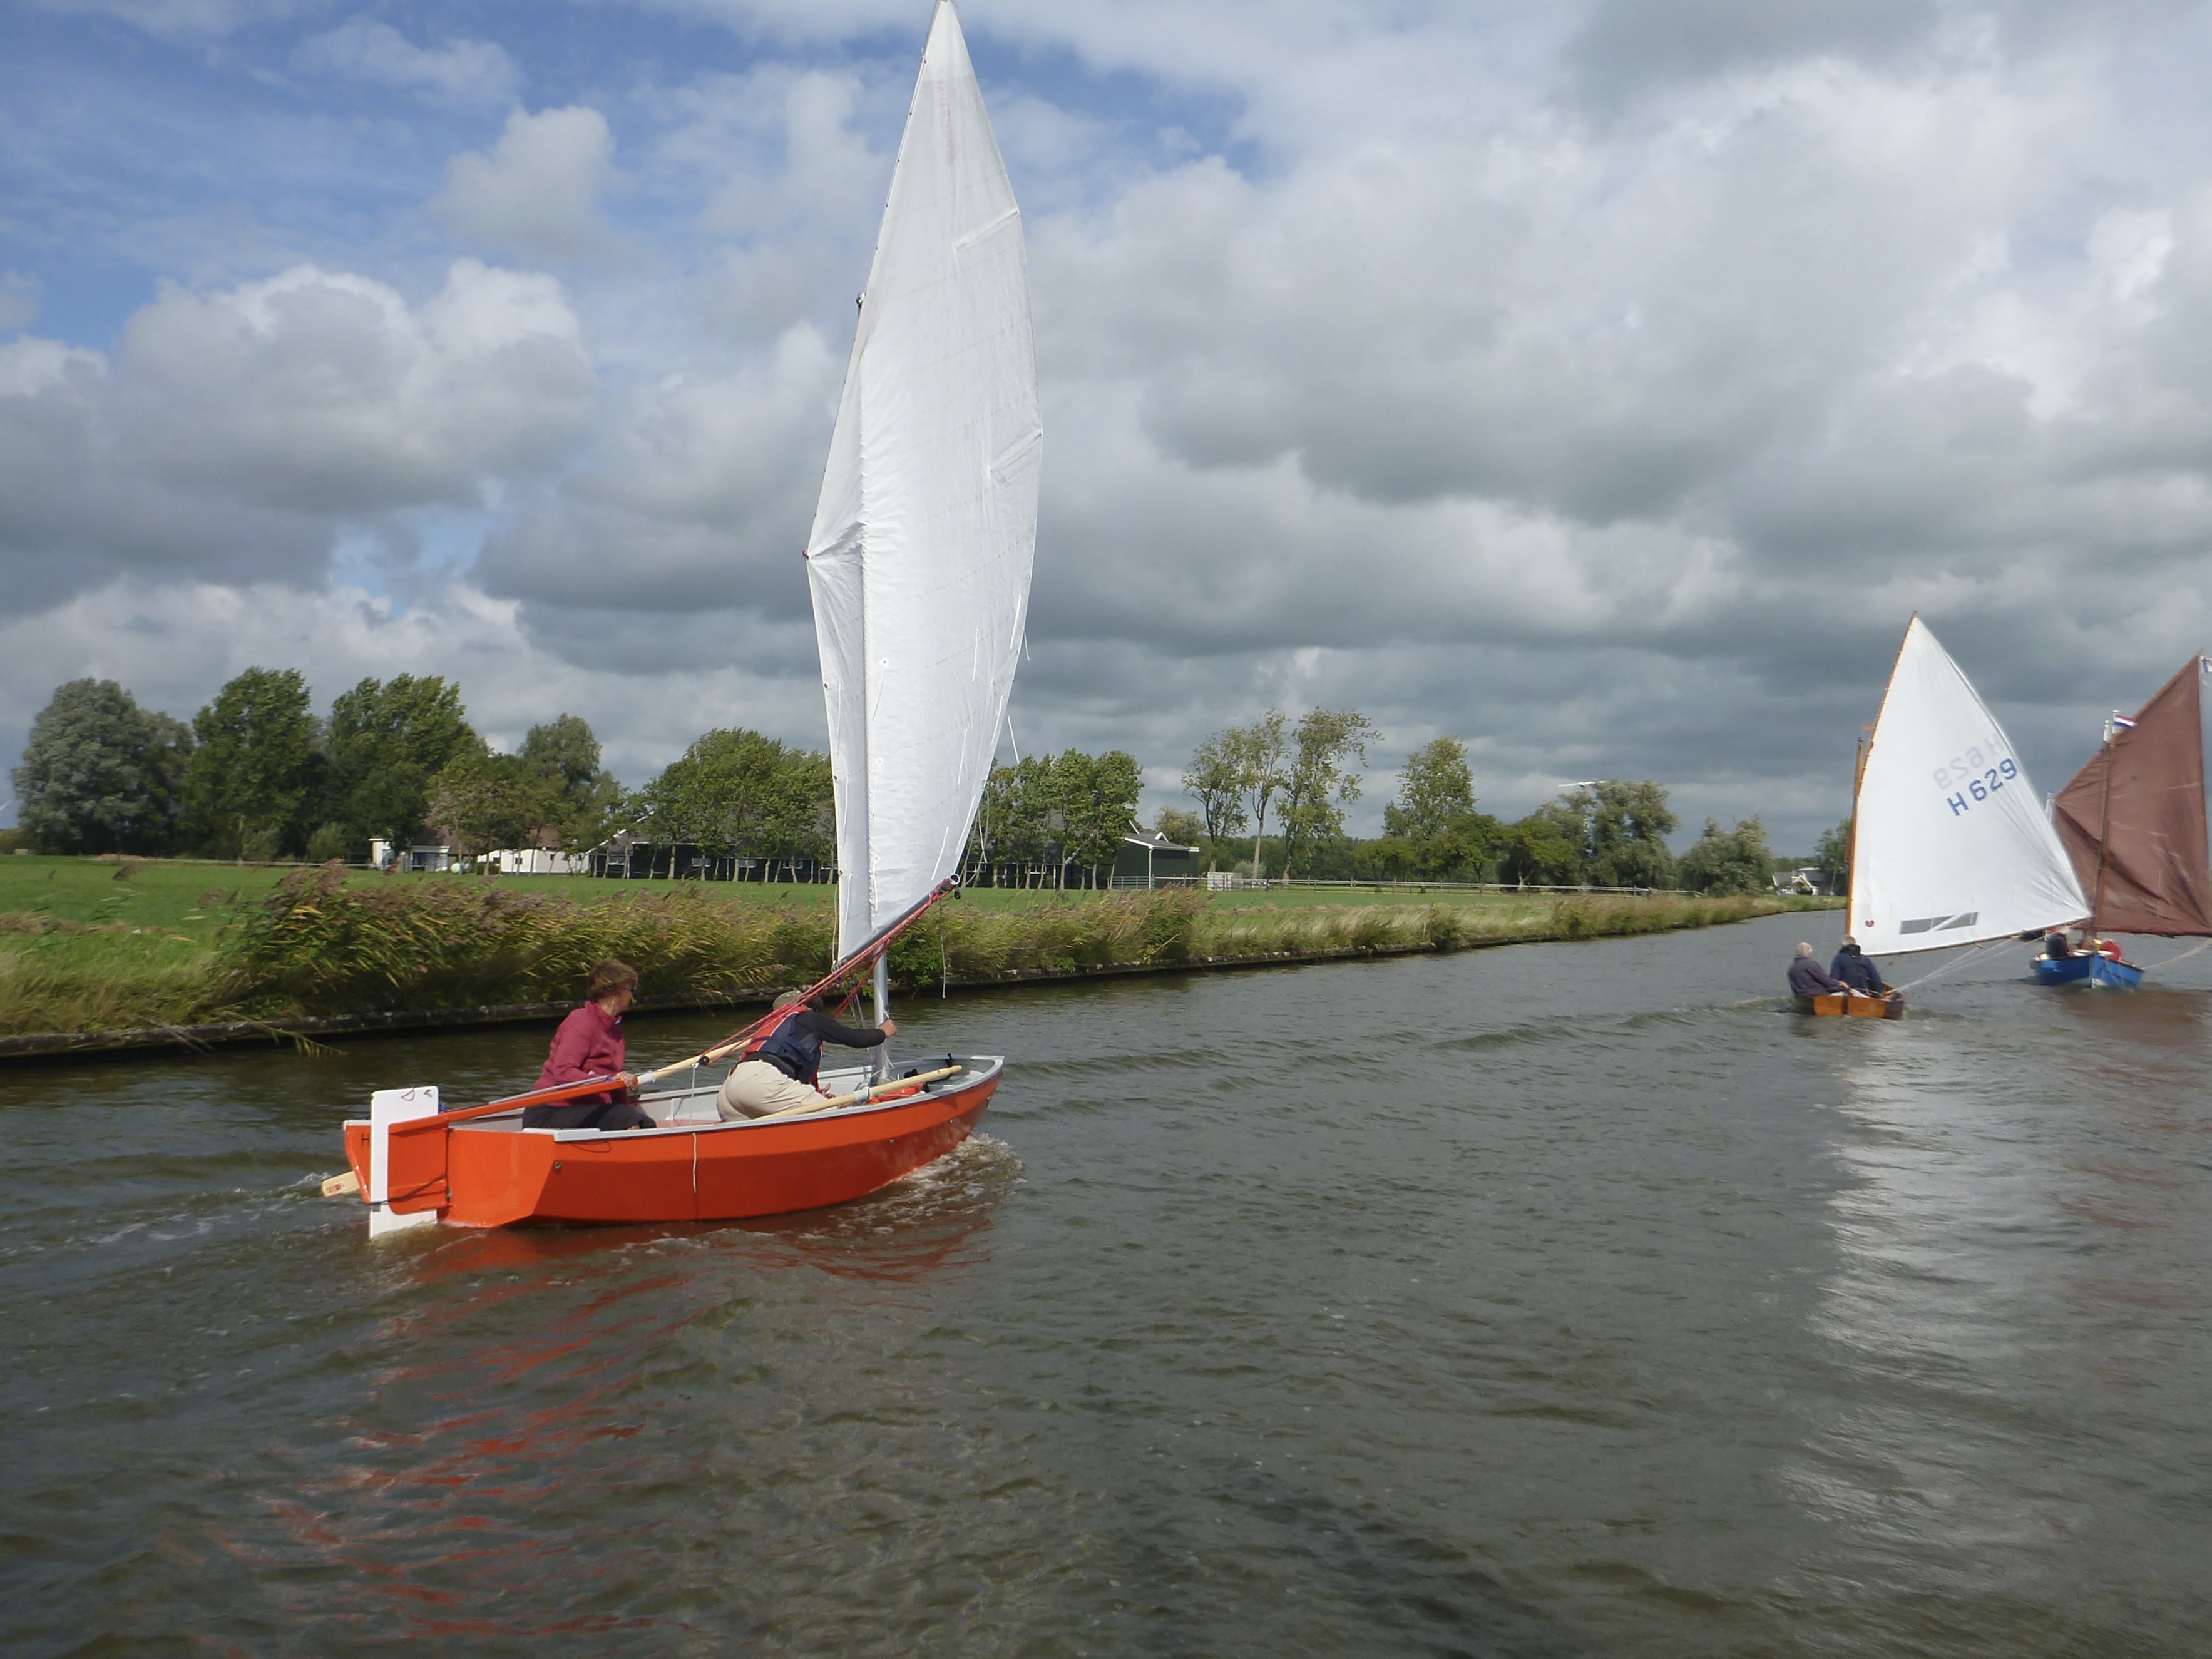
One of very few alloy rigs during the 2018 Dorestad Raid.
|


